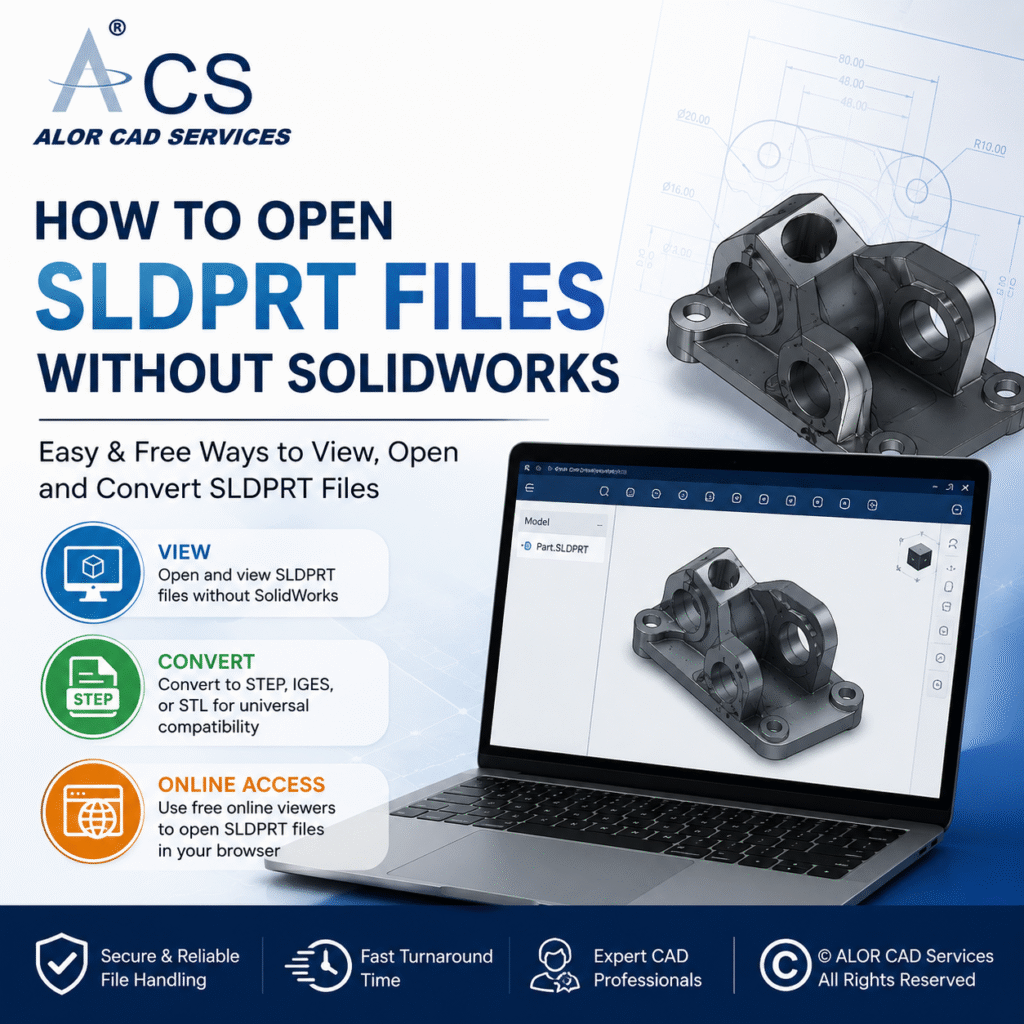
Solidworks 3d Model Into Revit Family
Converting Solidworks 3d part or assembly model into Revit family model is not an easy job if the part or assembly is too complicated. We will try to help understand how to use some basic tools and convert Solidworks 3d model into Revit and create parametric driven Revit families.
Let’s start with Solidworks 3d Assembly or Part file:
- If you have Solidworks 3d assembly compose of many sub-assemblies and part files than decompose those sub-assemblies into parts files or locate all parts files and try to understand each part and their relevant features.
- Start with simple part file not having so many features in it; this will help convert those part files in Revit family right away.
- Study the feature list and try to remove fillets and chamfer from the Solidworks part files
- Keep only basic features necessary to create the component under discussion
- Change all modeled threads into cosmetic threads and try to make the part file as simple as you can from 3d modeling aspect
- Save part files in .sat file format
- Try importing .sat file into Revit family environment
Sometimes it happens your part will not show up in the Revit at all after importing because of many other issues say:
- Solidworks part file is too complicated
- The part file was created using splines, surface and sweep features in Solidworks
Another option is if you can try to save Solidworks part files into AutoCAD .dwg format, and then try to import that .dwg file into Revit family than it can work too
Above all, it is a trial and error process, which can take 1 hour or 100 hours depending upon how complicated the Solidworks part or assembly is
As things are getting older, they are getting better 🙂
Solidworks has recently added a new feature where it enables users to covert Solidworks part or assembly files into the Revit family (.rfa) format.
Step-1
Open the part file you like to convert. Under Tools on the upper hand corner, click Export to AEC.
Step-2
In the Property menu, select the type of host component, its corresponding reference plane and add a reference point.
Step-3
- Choose the number of details you would like to export from the file
- Select the features you would like to export from the file
- Remove the features you won’t need from the file
- Review the preview of the graphics you selected to export
- Once all set, click Save As and select the .rfa type
- Select Export Custom Properties option to export the graphics you selected
- Click the option called Export and Click Save
- Solidworks software will now automatically convert the model into the .rfa format
Not an easy job, correct? No worries!
We have a team of proficient and affordable CAD modelers who can handle any size or volume of Solidworks parts or assembly and helps convert them to Revit family (.rfa) file as per your requirements.
- ACS CAD modelers help you save time and cost and most importantly no back and forth for your CAD projects
- We use a latest and old version of CAD software as per your requirements while implementing advanced tools and techniques and help you save a lot of time in reducing those back and forth revisions
- ACS will assure you fastest turnaround time with the best quality and low rate for your 3d modeling requirements. We want to help ease the 3d modeling process and save cost per 3d modeling
At ACS CAD Services we are committed and providing quality services as per your CAD requirements.
Let’s start reaping those benefits!
Call at 508.978.4628 or contact us at www.acscadservices.com/contact/